

As mentioned in my 35mm shoot-out blog post, I ended up buying two Olympus Trip 35’s and cannibalizing the components of one of them to repair the better of the two. This turned out to be an exciting adventure, and I’ve been meaning to write about all the things I learned as a result! So grab a coffee or tea, get comfortable, and lets have a look under the hood of the Trip 35.
Trip 35 Overview
The Olympus Trip 35 was designed by the legendary Yoshihisa Maitani, and introduced to the world in 1967. It proved to be a huge success for Olympus, with the camera effectively being a game-changer in the world of consumer photography right up until the late 1980’s.
The Trip 35 was lightweight & small camera, requiring no batteries, having a tack-sharp Zuiko 40mm lens, a built-in light meter (selenium), easy-to-understand zone-focus controls and most importantly, an automatic aperture control. All the ingredients of what would establish the Trip 35 as a cult status camera in the years to come, and still sought after now, even in 2025.

As I got to know the camera, I was genuinely shocked at how sharp that the little 40mm f/2.8 lens was from f4 onwards, very impressive. On the flip-side though, I soon realized that the Trip 35 is genuinely a ‘travel camera’, it’s designed to try it’s very best to get almost every photo at f/8 or higher. So if you’re looking for artistic shallow-depth-of-field photos, then this is not the camera for you, and to be fair, it was never designed to be.
Let’s have a quick run through it’s specs:
- Power: Battery not required
- Lens: Zuiko 40mm f2.8 (f2.8 to f22)
- Focus: manual focus from 0.9m to infinity
- Shutter: 1/40 or 1/200
- Mode(s): Program or manual
- Meter: Selenium light meter, center-weighted
- Weight: 410 grams (14.5oz)
- Size: 11.5cm x 7cm x 57cm (4.5″ x 2.75″ x 2.25″)
Common Problems with the Trip 35
When I was doing my research into pocketable 35mm film cameras with some semblance of manual controls, the forums seemed to indicate that Olympus Trip 35 could suffer from 4 common problems which can develop over time:
- Selenium light meter cell expired = the ‘red flag’ keeps appearing in the view-finder, preventing you from taking a photograph.
- Sticky aperture blades – even if the selenium cell is functional, the aperture blades won’t respond and move accordingly.
- Lens fungus / haze – the camera being left in damp, dark conditions develops fungus, which can etch into the lens glass itself in severe situations.
- The film-advance winder won’t move – no matter what you try to do, you can’t advance your roll of film to the next frame after you’ve taken a photograph.

Of the 4 listed above, only the sticky aperture blades and lens fungus can be mostly fixed without replacement parts. The interesting scenario I landed myself in is that of the two Trip 35’s I bought, neither of them were trouble-free, despite them looking like they were in pristine condition 😕
- Trip 35 #1 – Severely damaged middle lens element, which was beyond repair. The lens had become completely etched away by fungus and corrosion.
- Trip 35 #2 – the film advance winder was stuck, with no obvious reason why.
My solution was to take the film advance winder out of camera #1 and transplant it into camera #2. This would be an easier task than the alternative of removing the lens from camera #2, installing it into camera #1 and then recalibrating the focus distancing (I’ve done this before with a Rollei 35B in the past, and it’s a tedious & time-consuming task)
Initial Investigation
My first objective was to get a basic idea as to why the film advance winder on camera #2 wasn’t moving … perhaps there was a cog tooth broken, or maybe a piece loose and jamming the mechanics, etc. So I took out my watch / camera tools and began to carefully remove the top-plate of the camera #2.
I soon realized that removing the top-plate wasn’t going to be enough to see what was happening with the winder of the camera, so the film counter had to be removed … pretty straight forward. Here’s my monologue of what happened next:
“Oh, hang on … what’s that … hmm, the white plastic cog underneath the film counter seems to have tiny, barely perceptible radial crack … let me try nudge it with my flat head screwdriver … yikes, it just snapped in half!”
Yes indeed, the unfortunate winding cog had been structurally unsound, with its cog teeth shifting in & out of position as the tension increased. It just took a nudge from my screwdriver to be the straw that broke the camels back.
The Cog Transplant
The real challenge began when I tried to remove the ‘good’ winding cog from camera #1. From some rudimentary research, there were 3 steps that I was to follow:
- Remove the the film spool holder end-cap.
- Remove the film spool holder itself, to reveal the brass film-advance anti-slip spring mechanism.
- Hold the winding cog in place, and using a screwdriver, rotate the brass anti-slip mechanism underneath, which should release the white winding cog on top.
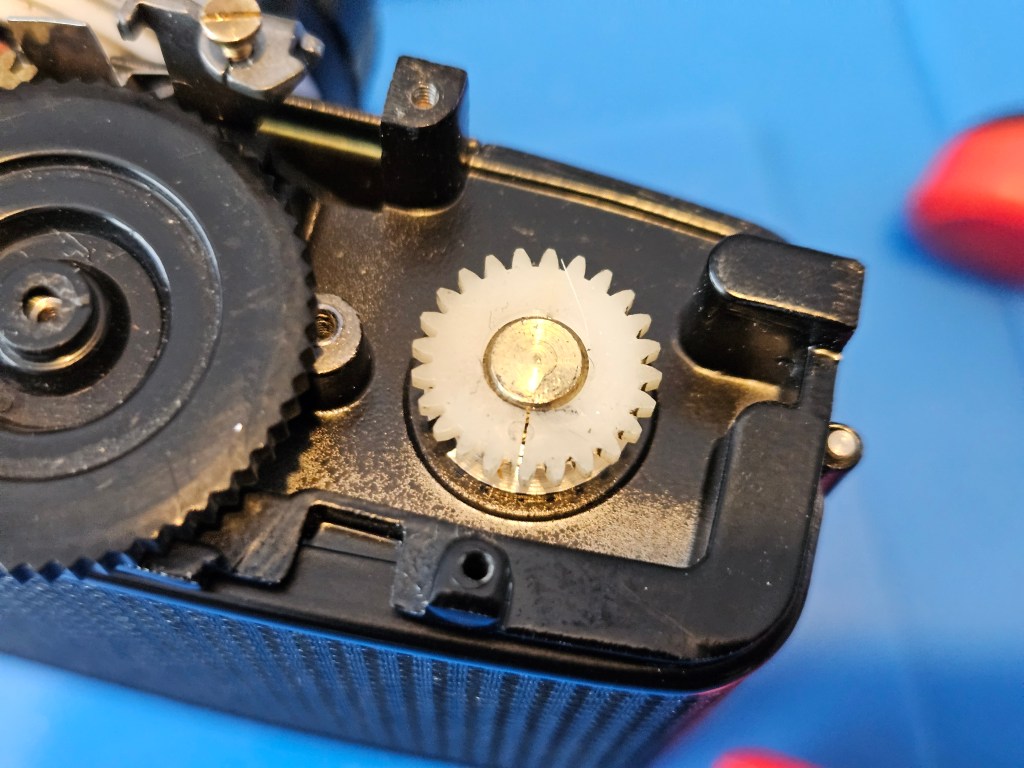
However, as much as I tried, the winding cog would not budge … I tried wedging it in place (image below) but no matter how carefully I tried to rotate the brass mechanism underneath … nothing moved 😕
The cog transplant was proving difficult, so I decided to hit the web again … AI was of no use, Reddit was a long trawl through mixed opinions & dead-ends … but finally some friendly people at a Facebook Olympus Trip 35 community page answered my plea, in particular a very generous Kjell Persson provided me with step-by-step photos. To which I’m extremely grateful, thanks again Kjell 🤩
What became very clear from the instructional photos was that I had been rotating the brass mechanism the wrong way … I was actually tightening the cog, instead of loosening it.


It would appear that the clever engineers at Olympus had to use a reverse-thread on the film advance mechanism, naturally, due to the way in which the winder has to rotate for the camera user. This makes a lot of sense, but only if you know this fact first when you attempt a repair.
So I turned the brass mechanism clockwise, instead of anticlockwise, and the white winding cog magically started to revolve off the camera. Brilliant ! With the replacement cog in hand, it was very straightforward step to insert it onto the brass anti-slip mechanism on camera #2 (err, turning the brass unit the opposite direction than you’d expect).
Once I had the film counter attached, the winding mechanism worked immediately, a job well done 🏆
Foto: https://the.fotoapp.co/iaa
Helpful Tips When Using The Trip35
I have to admit that I was very proud of completing this significant repair, and to give a Trip 35 a second chance at capturing images from 2025 and years into the future. An interesting side-effect of this experience was that I got to deeply understand how the Trip 35 works: the exposure trap mechanism, the shutter linkage operation, etc. I had become a Trip 35 “power-user”.
To that end, let me share some valuable findings about the Trip 35, which may be useful if you’re currently a user or plan to buy one in the future:
A. Zone Focus – it’s important to get familiar with the Trip 35 portrait zone distances by sight, using basic body proportionality. These simple sightings & settings helped me enormously:
- ‘One Person’ (1m) = with the Trip 35 held vertically, if the person’s chin is in the centre of the viewfinder, then you’re at 1m if their waist is at the bottom framing lines.
- ‘One Person’ (1m) = with the Trip 35 held horizontally, if the person’s nose is in the very centre of the viewfinder, then you’re at 1m if their upper chest is at the bottom of the viewfinder framing lines.
- ‘Two People’ (1.5m) = Trip 35 held horizontally again, if the chins of the two people are across the middle of your viewfinder frame, then you’re at 1.5m if their waists are at bottom of your viewfinder framing lines.
- ‘Street Scenes’ = I found that putting the focus distance a quarter (1/4) of the way between ‘Two People Standing’ (3m) and ‘Mountain’ (Infinity) is the sweet spot for general outdoors shooting … yes, you can actually set the Trip 35 focus distance anywhere, not just those 4 predefined zone notches.
B. Exposure – there are a couple of useful hacks you can use with your Trip 35:
- The humble Trip 35 has the ability to lock an exposure reading (i.e. AE-L), so in difficult light, just point your Trip to the shadows in your scene, carefully half press the shutter release button (you’ll see the aperture blades start moving) recompose and then press it all the way down.
- If the selenium meter in your Trip 35 is slowly expiring, resulting in drastically overexposed photos, then don’t forget that you can simply override the ISO aka ‘ASA’ and set it intentionally to a higher value. So if your ISO 200 film is being overexposed, then set the ASA dial to 400 or 800, etc. which may help bring back details in those skies.


C. Soft Images ?!? – people often complain that their Trip 35 produces soft / blurry images, but it’s usually because of camera shake at the ‘unexpected’ 1/40 shutter speed. To avoid this problem, simply place your left index finger under the lens housing, to help increase stability, and then push the shutter release button, very slowly all the way down. To go the extra mile for ‘important’ low-light photos, push the shutter release button only when you’re between your exhale and inhale breaths (i.e. when your chest & arms will be moving the least)
D. Impromptu Lens Cap – the Trip 35 light-sensitive selenium cell (behind those eye-catching bubble-shaped Fresnel lens) MUST ALWAYS be covered when not in use. If you don’t have a bag nor a lens cap, then rotate the ISO dial all the way down to ISO 25. What happens when you do this, is that an internal plastic cover will slide across the selenium cell, which at ISO 25 will hide almost 90% of the cell from light. Obviously don’t forget to set the correct ISO back again 😃
WRAP-Up
So there we have it, a simple investigation into a broken film advance winder turned into an eye-opening and exciting adventure, which made me appreciate the humble Olympus Trip 35 even all the more!
Until my next blog, keep shooting film ! Paul
