

So I haven’t posted any blogs in 3 months … what on earth could have caused this to happen … !??
Welcome to the world of DIY 35mm film scanning … who would have thought that such a simple endeavour could cause so much frustration, headaches, sleepless hours, and repeated post-processing !
Let me explain …
So why scan your own 35mm film ?
Having enthusiastically re-embraced film photography the last 2 years, it’s a natural process to wonder how you can get closer to the physical process that is film image creation.
While my favourite dev lab (www.printpoint.ie) was producing amazing images, I slowly began to wonder about two things:
- What it would be like to develop my own film – working through the chemicals and producing the negatives myself ?
- What would it be like to scan my own negatives – could I get better dynamic range, and higher resolution images ?
The wonderful thing about the internet and social media in particular is the wealth of information available !
So I decided, one step at a time, let’s try the negative scanning & post-processing first, and see how I progress.
After all, how difficult could it be …
Negative Scanning – which approach ?
The first thing I had to decide was which approach: a) buy a dedicated scanner (e.g. Plustek Opticfilm) or b) use my DSLR & macro lens ?
After a lot of research on these two approaches, I decided that the DLSR approach was probably the most expedient & cost effective option for me. I already had both cropped & full-frame DSLR’s, and reliable macro lenses.
The alternative approach of buying a new or secondhand Plustek scanner, seemed like a large financial gamble, for what was still in effect an experiment.
Basic DSLR scanning equipment
More research quickly revealed three critical components necessary to make this DIY scanning endeavour successful:
- A piece of equipment to hold my film in place & flat
- A piece of equipment to hold my camera & macro lens steady
- Software that could edit the raw negative files, and translate them to faithful positives
This is where the trial & error truly began, a lot of failures, a lot of headaches but finally some 35mm scans that were acceptable …
The first unexpected discovery was this neat little adapter which Nikon had produced called the ES-2, which attached a film strip holder directly to your macro lens … genius !
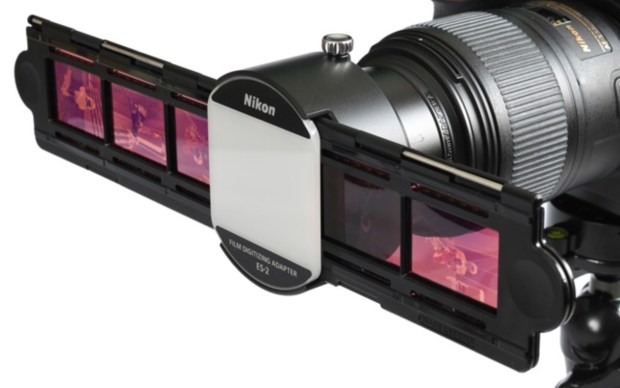
This little gadget immediately solved equipment needs 1 & 2 simultaneously, and remarkably well too ! Not only that, but I also discovered that there are third-party variations of this device that will cater for all camera makes, not just Nikon, as they include an array of adapters for your Canon / Sony / Fujifilm, etc..
So that left item 3, how to edit the negative raw files … reliably & consistently. This is where I lost a lot of hair and aged rapidly over the period of 3 months !! 😫
Experiment #1 – Basic Lightroom post-processing
As I say, the ES-2 gadget allowed me to get fantastic raw files of my 35mm negatives with relative ease. So being a heavy user of Lightroom (LR) the last 10+ years, that seemed the obvious starting place for the post-processing.
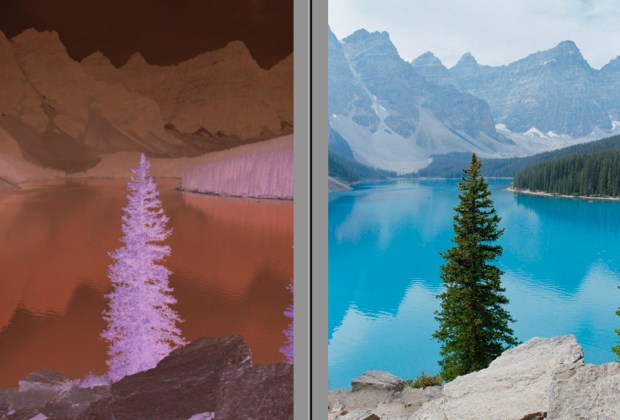
Some basic internet searching revealed that in order to edit a 35mm negative scan, it was simply a matter of inverting the curve – grab the bottom left handle, and drag it to the top. Then grab to top-right handle and drag it to the bottom:

However what I noticed was a persistent cyan colour cast, that proved to be very challenging to eliminate, as it varied from film to film, scan to scan, at different intensities:
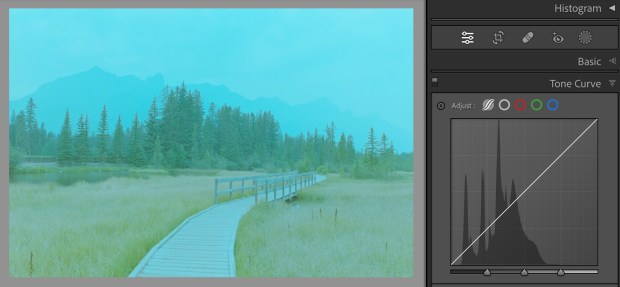
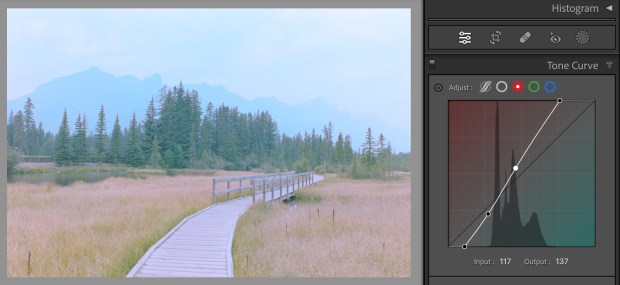
Apparently the only way of removing this, is to perform selective min & max curve flattening across the red, green & blue channels individually:
I spent days embarking on a lot of trial and error, to see if I could accomplish a decent end-product. However, it was proving to be a lot of hard work, absolutely frustrating and just not good enough 🧐😕
What made this all the more challenging is that fact that once you invert the curves, the controls in Lightroom work in the opposite direction 😖
Experiment #2 – Use a LR plug-in
Soon after, and following some more research, it became apparent that the LR plug-in “Negative Lab Pro” was the way to go. It was going to cost a little bit, but the few experiments I did with a trial copy were showing some promising results.
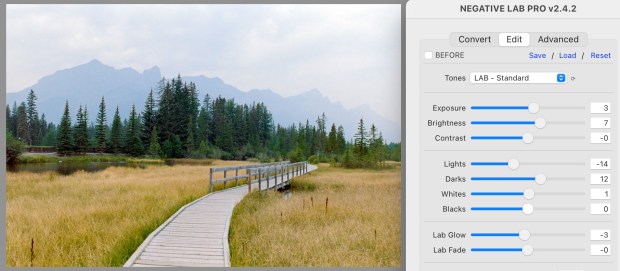
As you can see from my screenshot above, Negative Lab Pro (NLP) is excellent, very powerful, intuitive and offers some great controls.
I was finally starting to get some nice images – yeaahhh ! 💯
I soon found myself spending weeks enjoying messing about with NLP scanner profiles (e.g like Frontier, Crystal & Pakon) and % scan coverage. Then more weeks experimenting with getting the tonality, white balance and overall colour balance reasonably reliable …
I’ll be honest and say, that after almost 2 months, I was beginning to get frustrated with deleting exported files, re-processing, and re-exporting again … only to find that I was still getting odd colour shifts that the perfectionist in me couldn’t ignore.
What I noticed more recently is that NLP handles FujiColor C200, Kodak Gold 200 and Ektar with consummate ease – wonderful – however Kodak Portra 160 & Kodak Portra 400 films have very strong blue saturation, which needs to reworked afterwards 😫


So my workflow was soon becoming: 35mm film camera –> negative develop –> DSLR raw file scan –> LR import –> NLP raw file processing –> export –> LR jpeg post processing –> export
Conclusion
So three months later, what can I conclude … personally speaking, the DSLR scanning approach to 35mm colour film is just not for me.
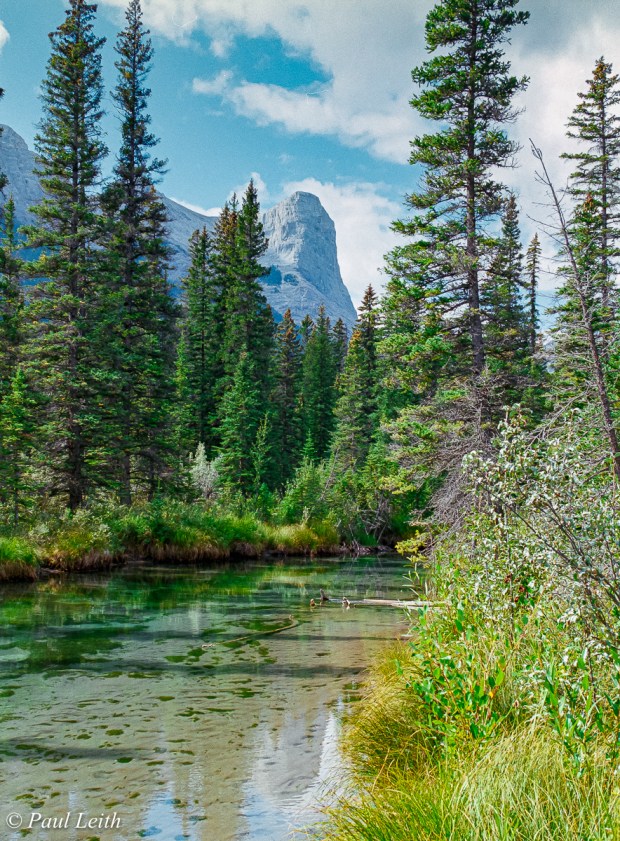
I am certainly able to get acceptable images – the resolution has improved marginally, the image size is larger (now averaging 4200-4400px wide), but the dynamic range is the same.
If anything, the whole experience over the three months has made me really APPRECIATE the craftsmanship & skill of my local film lab !
However, as I say, this is just my perspective … you might decide that it’s worth a shot, or you’re perfectly happy with the results you obtain following your particular process and equipment.

Either way I hope my sharing of this experience helps in some way. In the meantime, keep shooting film !
Instagram :: #irishanalogadventures
