

So Many Lessons !
So I’ve been taking photos for the last 15+ years, with wedding & corporate shoots under the belt, along with assorted photography trips … but yikes, getting to grips with my Nikon FE2 & Nikormat FT2 film cameras and flash was soooo challenging initially ! 😲
So let me share the important things I learnt in the process, so you don’t have to experience these headaches when attempting flash on 35mm film (regardless of which make of camera you have)! 😇🧰📸
Manual vs ‘Auto’ vs TTL
When it comes to using ‘proper’ flash gun systems, I’ve had experience with Canon, Nikon and Sony. However, it’s been all digital iTTL/eTTL … 100% automated, you can immediately see what’s happening in the image review and tweak on-the-fly (a major plus for digital ✅). However, with 35mm film I had to do a lot of research first, conduct set experiments, wait on the results in the post-development … and only then proceed with confidence.
First & foremost, you need to know which flashgun technology you’re dealing with:
| Manual | The most fundamental level of flashgun ‘technology’ … the unit may have a basic power level control (or indeed may have none whatsoever) and you control how much flash is hitting the scene by using your lens aperture, subject distance and the power setting. This flash technology comprised of a hotshoe with a single contact pin, often accompanied by a ‘PC sync’ port on the camera body, to attach a cable to an external studio strobe light. |
| Auto | The flashgun itself has the ability to input both the a) film ISO and b) aperture, and the small sensor at the front of the flashgun throttles the flash output automatically 👍 At the time this was a wonderful advancement in flash technology – you no longer had to worry about the distance from your subject (within reason). However, it’s shortcomings were that it didn’t take into account things you may place in front of your lens .. filters, bellows, adapters, etc. |
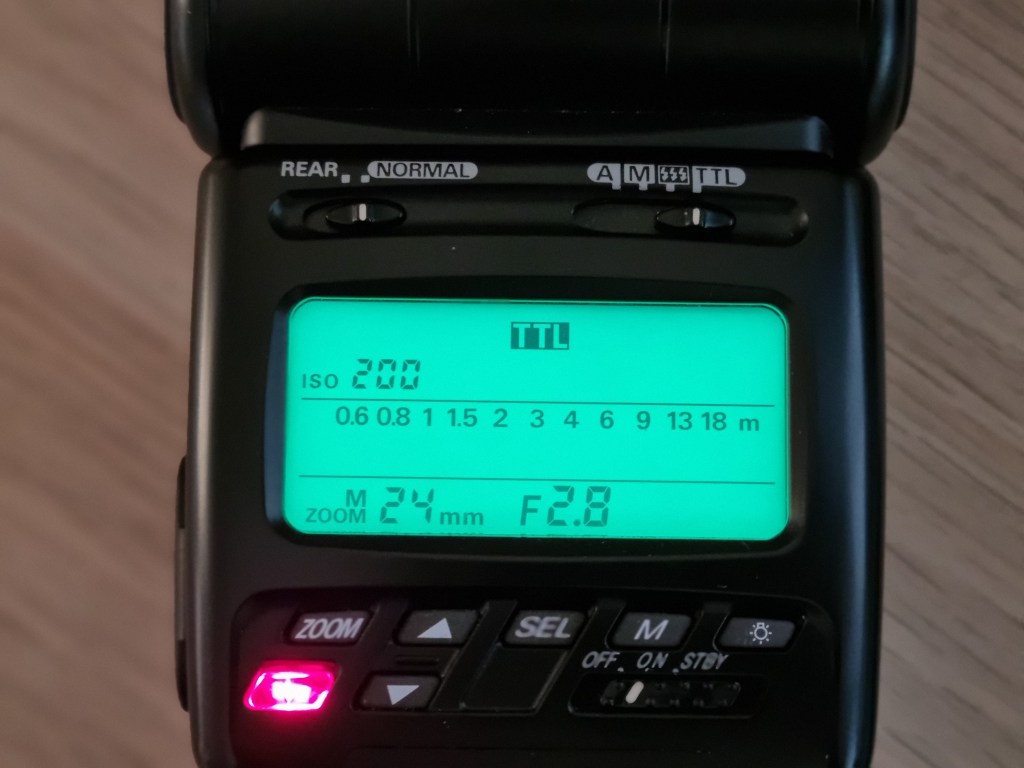
| TTL | Through-The-Lens (TTL) was the great leap-forward in flash technology, both the flashgun and camera worked together sharing ‘real-time’ information about the entire lens & film settings plus light received (by the camera AND the flashgun) = awesome 💯 You can easily spot this, as your camera hotshoe will have its central contact point surrounded by one/two other smaller contacts. Now you could walk around your subject, move about, and add any array of attachments to your lens and not worry ! This was done by the film camera having one/multiple little sensors placed behind the camera’s film plane, which measure the actual flash light received on the film negative itself. This supplemental information was then passed to the flashgun to throttle the output. |
| iTTL / eTTL | With the advance of the digital camera era, a major issue ensued … the semi-transparent 35mm film negative was replaced by a solid digital sensor, so measuring the light received on the ‘film’ was no longer a possibility ! Enter iTTL/eTTL … a series of rapid, and imperceptible pre-flashes are emitted by the flashgun BEFORE the actual proper image is taken, during which the camera’s processor analyses the information and then works in conjunction with the flashgun to throttle the light output. This new flashgun technology opened the door to enabling wireless control of multiple flashguns simultaneously with controlled ratio settings = phenomenal 🤩🏆 |
Your 35mm Camera and Flash
So now that you got the run-down of the different flash technologies, you need to determine which one your 35mm camera is compatible with (a quick search in the user-manual or a Google search) and proceed to the next step.
Example – Nikon : a great case in point, is that not all cameras implement TTL the same way within the Nikon family, as I learned via a lot of trial-and-error:
- Nikon FE / Nikkormat FT2 – no TTL at all, just a single hotshot contact point. So you’ve got to use a flashgun that provides manual control of its power output, or at least offers an ‘auto’ mode. You can assume manual & auto are the lowest common denominator for all cameras …
- Nikon FE2 – it has TTL, however, it does not have the ability to send the camera’s aperture & ISO settings to the flashgun, they must be entered manually into the flashgun. As you can imagine, this was a MAJOR lesson-learnt … I wasted a lot of frames until I unearthed this crucial piece of information ! It also means, you can only select a number of old compatible flashguns that offer this manual input capability if you wish to avail of TTL …
- Nikon N80/F80 – it has TTL, and not only that, it sends all the camera settings automatically to the flashgun = completely hassle free ! This invariably means you can also use more modern flashguns too (e.g. cheap third party Godox strobes, which have wireless functionality, etc.) 💯
So now let me share some helpful lessons-learnt across all the above flashgun technologies, when using using flashguns for real (on your unsuspecting family, friends & pets) !
Manual Flash
When I started using my Nikkormat FT2, I realised I was entering a manual-only world of flash (I never knew ‘auto’ existed), which was alien and laden with many mistakes. However here’s a few helpful tips:
- As you’ll be mostly using flash to photograph indoors, determine what your most common aperture usage is … for me it was f2.8. Take note of your film ISO, and then take 4 test photos of something that’s not overly bright nor dark :
- F2.8 (or your favourite aperture) with your subject 2m away, at half flash power
- F2.8 (or your favourite aperture) with your subject 1.5m away, at half flash power
- F2.8 (or your favourite aperture) with your subject 1.5m away, at quarter flash power
- F2.8 (or your favourite aperture) with your subject 1.5m away, at an eight flash power
- When you get your negatives developed you will quickly see the affect of the flashgun power levels … at the same subject distance and the same aperture. This will be invaluable information !
- You can now make a quick ready-reckoner of what flash power settings you need for that ISO @f2.8 (or your favourite aperture) at 1.5m, and most likely a good approximation for 1m (slightly less) and 2m away (slightly more).
- I wrote these on a post-it and taped it to the back of my flashguns !
- Spend time practicing your ability to recognise when something is 1, 1.5 and 2+ meters away … (even a piece of string with knots tied at these distances is a great hack) 🧐

Auto Flash
The biggest learning here was that most modern flash-guns don’t have this legacy capability at all … they’ve ditched it 😕 For my FT2 & FE2 I had to do a lot of research and found that the Nikon SB-25 (and similarly related flashguns) offered manual, auto & TTL (manual input & direct send from camera) mode capabilities … and I could get them on eBay for €25-€45 perfect !
I found using the ‘auto’ mode to be very straightforward and reliable – simply punch some dedicated buttons on the flashgun to enter the film ISO and the aperture, and off you go.
However, you need to be careful – it can be easily fooled:
- Reflective surfaces (water, kitchen units, mirrors, etc.) can quickly fool the sensor on the flashgun into thinking it received enough light.
- Dark surfaces (subject in a dark t-shirt, the shadows, etc.) fool the sensor into drastically over exposing the scene
- Finally it can be difficult to balance ambient light with flash light
So you cheat, and intentionally set the aperture or ISO settings on the flashgun to be lower/higher to compensate for this.
However, the ‘auto’ mode does become cumbersome when you start changing your aperture a lot … you’re having to remind yourself to also change the flashgun setting too : you’ve been warned ! 😏
TTL Flash
As mentioned above, please please double check whether your particular 35mm camera is capable of automatically sending all its film ISO & aperture settings to the flashgun, or whether you have to enter the info manually (like ‘auto’ mode described above). Just because a camera has TTL flash doesn’t necessarily mean it can communicate all of the required information to the flashgun …
That all said, if your camera has the ability to send its film ISO & aperture settings to the flashgun, then the sky is the limit ! 🤩 You have the ultimate flexibility in terms of using your flashgun and potentially embracing more modern flashgun features (high-speed sync, strobe, front vs. rear curtain sync, red-eye reduction, etc.)
I love fully-functional TTL flash … which is why I get a lot of mileage from my €70 Nikon N80. I’m able to attach a small TTL flashgun and enjoy the advanced abilities of bounced flash on 35mm film.


Flashgun Technique
Let me wrap-up this blog by sharing a few hard-won nuggets of practical info you ought to be be aware of, which will help give your 35mm film photos that extra polished look when using flash.
Flash Sync Speed : this is the fastest shutter speed your camera can go when using a flashgun, if you exceed this speed you will see strange dark horizontal bands appearing in you negatives … ! The sync speed is important, as it effectively states the maximum extent to which your camera can block out ambient light when using a flash : especially important in a studio scenario.
Dragging The Shutter : if you blindly set the camera to it’s sync speed (e.g 1/200, etc.) you might be in danger of producing film photos which have the background behind your subject looking like a pitch-black cave …. So photographers got smart and realised they could lower the shutter speed (e.g. from 1/200 to 1/30) to drag more ambient light into the frame, with the advantage of the flash still ‘freezing’ the action of your subject = no subject blur and nicely exposed background too 💯
Bounced Flash : in my opinion the modern-day masters of flashguns are David Hobby (aka ‘Strobist’) and Neil Van NieKerk. The biggest lesson I learned from these two guys was to never shoot the flashgun straight at your subject from the camera … if your flashgun permits it, rotate the head of it so that it’s pointing “over your shoulder” (or even take the flashgun off the camera completely and trigger it remotely – a whole topic in itself). In summary, always bounce your flash, if you can !
Conclusion
This has been 2 years of trail-and-error distilled into a single blog post, but hopefully it helps fast-track you into exploring film + flash with confidence. Until my next post, keep shooting film !
Paul
