
When deciding to hike the 3 highest mountains in Ireland in one day, a lot of preparation and smart decisions were going to be necessary, especially when 35mm film photography was going to be an important part of the experience.


What to bring ?
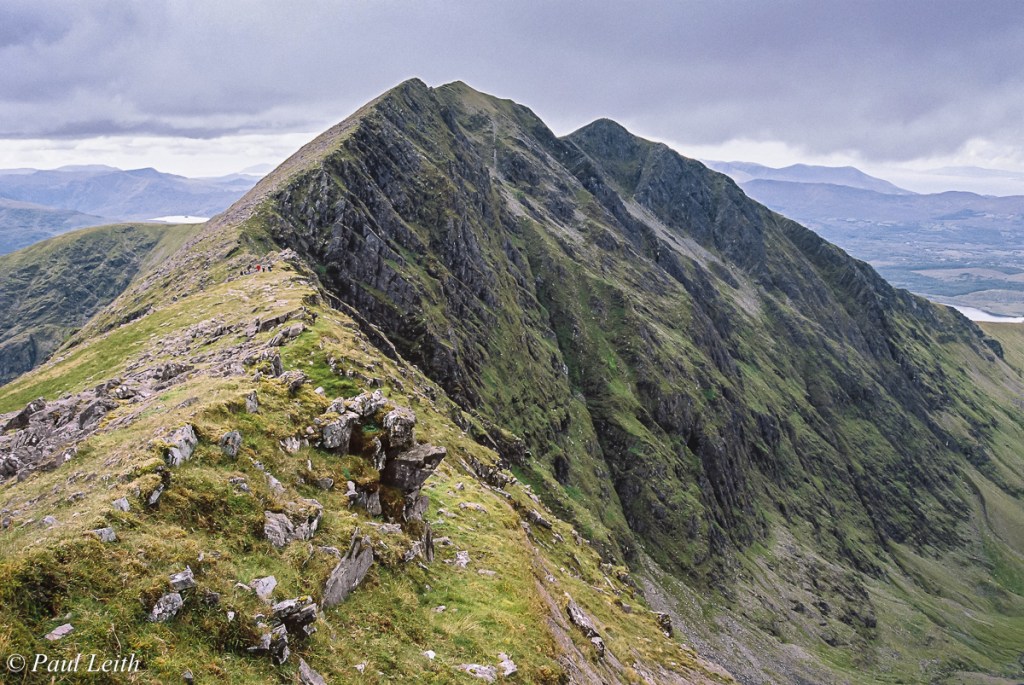
I did a lot of research about the Coomloughra Loop hike, how it encompasses Skregmore, Beenkeragh (3,313ft / 1,010m), Carrauntoohil (3,407ft / 1,039m) and Caher (3,284ft / 1,001m), and in particular the infamous Beenkeragh Ridge which joins Carrauntoohil to it’s name sake, Beenkeragh mountain.
It became very obvious that this was something I was going to have to prep for, a few months beforehand … getting fitter, ensuring I had the right equipment, getting familiar with the weather patterns and routes, ensuring I knew when & where I could turn-around if conditions got bad.
Travelling light, bringing emergency items, with room for extra water and a bite to eat was the priority ! To that end, I decided that my Nikon N80, a 28-80mm ‘walk about’ lens, my 70-300mm telephoto, and two rolls of Kodak Portra 160 film were all I could bring. No tripod, no ultrawide, no prime lens, no filters, no adapters … 😯😇

For 4 days prior to the hike I was continually checking the weather, in particular the cloud-base height on my app, Windy. No point travelling all the way down to Killarney Co. Kerry to climb 3 mountains with zero visibility !
Wind & Low Visbility
The views from Skegmore were beautiful, however I couldn’t help but notice the clouds getting lower as I got closer to Beenkeragh … uuurgh. However this was something I anticipated, as my weather app had predicted it was not to last and that they would be scattered clouds later … 🤞
By the time I hit the 1st summit, I could barely see beyond 20m in front of me. As a momento, I took these snaps along the route to Beenkeragh before I reluctantly packed away my Nikon N80 ! 😒


The Clouds Lift
It was decision time … the visibility was still bad … I nervously made my way down from Beenkeragh, trying to locate the start of the ridge across to Carrauntoohil … checking, and cross-checking maps, compass, gps location … if this wasn’t the right location, or if the visibility didn’t improve it would be time to turn back, as this section of the hike would be too dangerous.
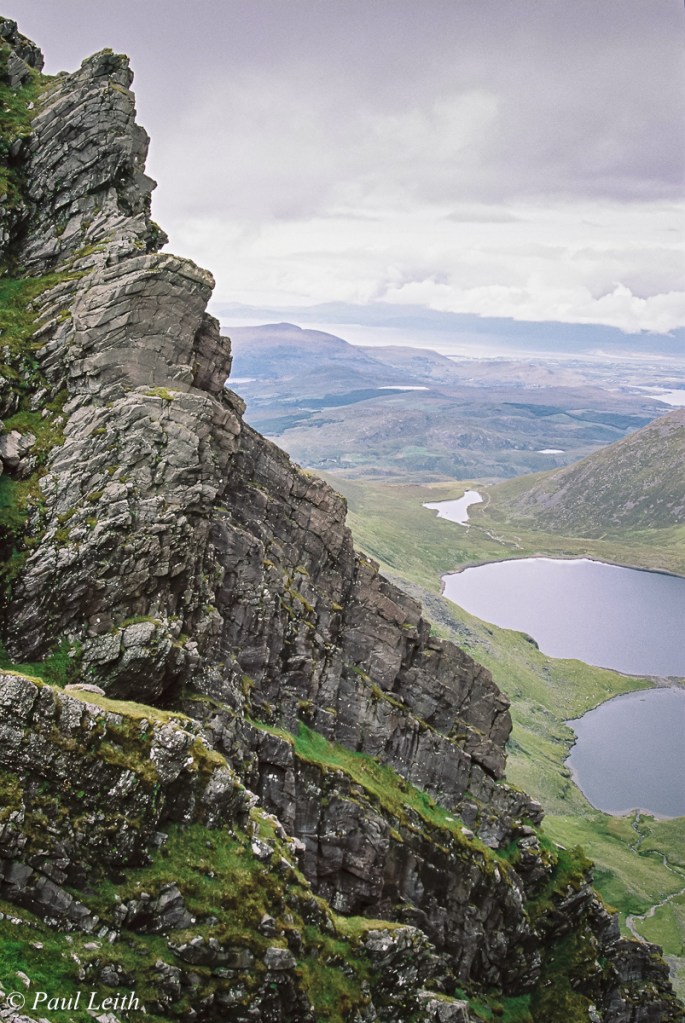
Fortunately I quickly found the path across the ridge, and I kid you not, as soon as I started edging my way across it, the clouds started to lift – beautiful views down O’Shea’s Gulley and out across the eastern approach to Carrauntoohil appeared !
I was overjoyed ! The rest of the hike could continue ! 🤩👍
What was wonderful about the camera, lens & film choices, was that I didn’t have to worry or fuss – I was able to get my photos onto Kodak Portra film, while focusing on getting safely across the ridge and up to the summit of Carrauntoohil


The Home Stretch
Having been on the summit of Carrauntoohil twice before, it was like meeting an old friend that I hadn’t seen in a long time – I took the opportunity to drink water, have a bite to eat, tighten my hiking boot laces, and watch other hikers arrive & leave : the majority of them celebrating their ascent with hugs and shouts of joy 🙂 The views across county Kerry and onwards were simply beautiful.
For me the hike onwards to the last summit, Caher turned out to be the real highlight. What an exhilarating hike, close to the mountain edges, steep drops, and views down to the glaciated lakes below. I was so happy I brought my film camera !


Creating and composing film photographs on the sides of mountains, hand-held, in changing weather conditions can be daunting at first, however, I learnt to use the following rules of thumb:
- Aperture & Shutter speed : Use the aperture that guarantees a shutter speed that you will help you avoid camera shake (i.e. approx. 1/focal length … e.g. a 50mm requires 1/60 or faster, a 35mm requires 1/30 or faster). If that means you’ve got to shoot at f2.8, f4 or f5.6, so be it … I would much rather have a crisp artistic shot, than a blurry shot with great depth-of-field !
- Make-shift Tripod : if you’re lucky and your film camera has a self-timer, don’t forget to put it on a rock / stone-wall, etc. which can improvise as a tripod. I usually put my camera on my hat, which allows me more flexibility in adjusting & straightening the image. This helpful tip will allow you use f11 and longer shutter speeds when it’s overcast.
- Focal Point : when using 24-50mm focal lengths and being forced to use f4 to f8 apertures on big scenes, you’re best focussing on something a third of the way into the frame, preferably something eye-catching – a rocky outcrop, a clump of grass, a distinctive colour change in the landscape.

Epilogue
When embarking upon bigger photographic endeavours, it really does pay to prepare, prepare and prepare !
For me this was one of the most memorable film camera experiences I’ve ever had, and I hope what I shared helps you somewhat if you wish to try something similar.
In the meantime, keep shooting film !
Paul
BTW: a big word of THANKS to http://www.printpoint.ie for the fabulous film dev & scan, the quality & turnaround time was phenomenal 🏆
💻 Instagram: @irishanalogadventures
