
- Choosing a 35mm film camera
- Which lens to buy
- How to meter successfully
- Center-weighted Exposure Guide
- How to manually focus successfully
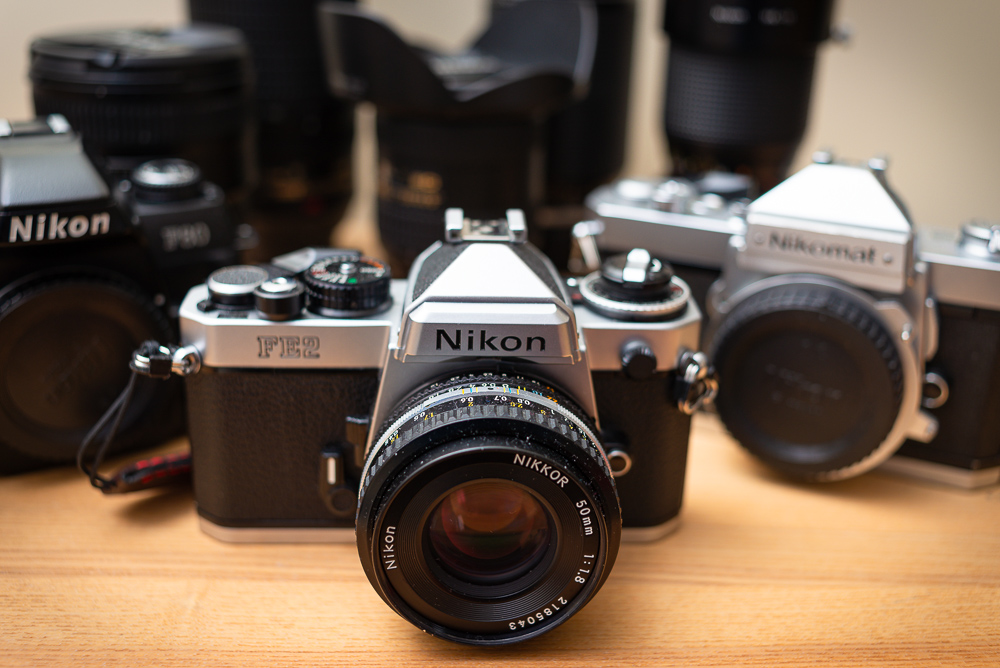
Choosing a 35mm film camera
There are many variations of 35mm film cameras out there – SLR’s, range finders, compact point-n-shoot, etc. For me I quickly decided that a SLR (single lens reflex) is something I’m very familiar from years of digital cameras – similar interface, similar focusing, interchangeable lenses, and familiar TTL flash gun territory.
As we’re dealing with old cameras, secondhand is the way to go, and there’s an amazing amount of great prices and bargains to be had, especially when you visit eBay, Adverts and DoneDeal.
However, here are the main things to watch out for:
- Don’t buy an ‘as-is’ 35mm film camera … that’s codeword for faulty 🤔
- I recommend that you buy a camera with in-built exposure metering. The ‘sunny 16’ rule won’t help you indoors … while bringing a separate gadget for light metering is hassle
- Ensure the viewfinder is clear (small dust specks are not a big deal)
- Consider getting a camera from a familiar manufacturer (or that you’ve already got compatible lenses)
- It’s not a big deal if your film camera is manual focus only with no ‘fancy’ autofocus point(s), however do keep it in mind, that in the future you may need AF for portraits (focus on eyes) and moving subjects (sports & kids)
- Do research your lenses, as certain manufacturers changed their lens mounts as their cameras evolved across manual focus film, to autofocus film, onwards to digital and the necessity of digital film focus requirements. Nothing worse than buying a lens you can’t use.
I’m happy to say that over the last 20 years I’ve had exposure to all manner of cameras from Kodak, Canon, Nikon, Panasonic, Sony and Fujifilm. From all my research last year, I quickly concluded that Nikon seemed to offer the widest scope of backwards lens capability, with their F mount.
Which lens to buy
Choosing your first lens is actually quite important, as it greatly influences your initial experience with film photography – making it either the drudgery of hit-n-miss shots, or the happy surprise of unexpected goodness.
I’ve discovered, that contrary to popular opinion, that buying a 50mm prime lens MIGHT NOT be the best idea ! Now why would I say such a jarring thing, here’s what I’ve experienced:
- 50mm is actually very good for photographing people (particularly from the waist up or at a distance)
- However, 50mm is too tight to include the environment, resulting in you continually backing-up to the door & walls
- 50mm just doesn’t cut it when you want to take a photograph that encompasses the breadth of a beautiful landscape, and instead you end up having to crop a sub-section of it
- On the other end, 50mm is not tight enough for ‘real’ portraits

So what do I recommend … please buy yourself a 28mm, 35mm or 40mm prime lens, that’s f2.8 or brighter (e.g. f2, f1.8 or f1.4). That focal range for starting out in film photography will give you the most creative flexibility in my opinion.
After that, you ought to explore 24mm, 50mm and 85mm primes. I’ve found that some of the old AF zoom lenses from the late 80’s-90’s are actually very good, although they tend to be a little soft in the extreme corners, but that’s usually a fair compromise for the flexibility of 28-80mm.
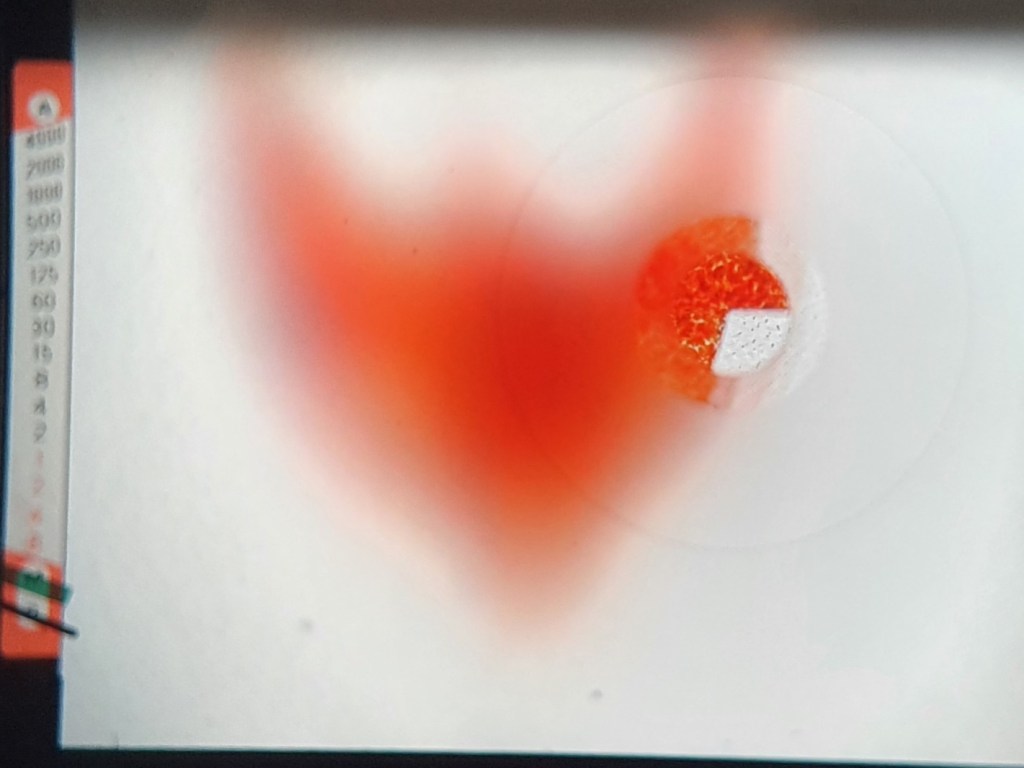
How to meter successfully
Other than inserting a role of film, everything else was the same for me except for two things: 1) fluid & reliable manual focusing, and 2) getting trustworthy exposure metering, especially using old style centered-weighted metering. It’s this second item which proved to be the biggest learning curve.
I did a vast amount of reading, research, experiments, wasted frames and finally realised that learning relative colour brightness was the key to center-weighted metering success.
The following ready-reckoner table, which I compiled over the months, helped me nail accurate exposures.
How to use: when you’re framing your photo, see if any of the items listed below appear predominantly in the ‘middle of your viewfinder’, and adjust accordingly:
| Colour Ref | Helpful Examples | What To Do |
 | 1. Sunsets 2. Bodies of water (lakes, rivers, etc.) 3. Dark moody skies 4. Deep forest trees 5. Brown & purple heath (Wicklow mountains) 5. Deep blue of the high sky 7. Shadows (e.g. dark side of buildings & under bridges) 8. Dark objects | Set your exposure to be 0.5 to 1 stop darker. … With film you don’t really want anything more than -1, as film loves light … |
| Coloured skin (portrait) | Set your exposure to be 0.33 to 0.5 stop darker | |
 | 1. Grass & new leaves 2. Light concrete & footpaths 3. The colour red & dark orange 4. Medium-blue middle sky | This is ‘normal‘ exposure – you’re good to go 👍 |
| Caucasian skin (portrait) | Set your exposure to be 0.33 to 0.5 stop brighter | |
 | 1. Fluffy clouds 2. Light-blue skies (close to the sun’s position) 3. Light coloured flowers 4. Gold & silver | Set your exposure to be 0.5 to 1 stop brighter |
| Frost / snow and white objects | Set your exposure to be 1 to 1.5 stop brighter |
Center-weighted Exposure Guide
It’s important to realise that film doesn’t like being under-exposed, and things that look dark or black to our eyes, most likely only need 1 stop under exposure compensation. While film can handle 3-4 stops over-exposed with consummate ease 🙂
But what about this “Sunny 16 rule” you ask ?
Well it’s a handy way to remember what general exposure settings you ought to be using outdoors.
It’s quite simple to use: on a bright sunny day (i.e. no clouds in the sky), you should be able to confidently take a photograph that includes large swathes of those blue skies, by setting your lens aperture to f16 and your camera shutter-speed to approx. 1/Film ISO (e.g. if you’re using ISO 100 film, set it to 1/125, while if you’re using ISO 200 film, set it to 1/250, etc.).
However, there’s two important things people forget to tell you about the sunny-16 rule:
- The recommended aperature (f16 – sunny, f11 – bright with scattered clouds, f8 – cloudy, f5.6 – overcast, f4 – shade) is just a starting point. For example, if the outdoor conditions recommend f8 (at 1/250 on your ISO 200 speed film), then don’t forget you can also shoot at f5.6 at 1/500, or f11 at 1/125, etc … use the exposure maths 🤓
- Remember that as soon as your photo starts to exclude less of the blue skies and more of the foreground, you’ll need to switch that aperture from f16 to f11 to avoid underexposed images …
If you want to try the same rule indoors you’ll most likely use f1.8 / f2.8 … That all said, I’ve made up my own version, which I jokingly refer to as the “Cloudy 5 rule”, as it’s mostly f5.6 outdoors here in Ireland 😉
How to manually focus successfully
I learned some great tricks in the last year on how to improve upon my manual focus technique when it comes to split-prism focusing. Remember, you’ve only “one auto-focus point” … 😉 … so getting focus and then recomposing your photograph is the primary methodology.
Have a look at this example, taken from my trusty Nikon FE2:

For rapid manual focussing I use these 4 steps:
- Use the ground glass outer-area to get ‘general’ focus
- Then point the split-prism ‘centerline’ on a well-defined edge (e.g. edge of a wall, a tree trunk/branch, edge of clothing, the eyebrows of a person, etc.) on the subject of interest, ie. something that helps you quickly & easily align the split-prism edges
- Slowly rotate your lens focus slightly forward, then slightly back, and then forward again, stopping at the optimal mid-point. Remember, at f4 and beyond you’ve a lot more depth of field to cover up your inaccuracies 🙂
- Then recompose the image to your liking without swaying your body too far forward or back … keep steady & still !
It takes a little practice, but I promise you’ll improve quickly and it will become second nature 👍
But what about this “zone focusing” you ask ?
When I was initially struggling with manual focusing, I started reading about street photographers that used a ‘zone focusing’ system. Essentially, they simply set the lens to f11 and then picked only one of two distances to use … for a 35mm lens it’s a) 2m and, b) approx. 5.5m. That’s it, no more lining things up with split-prism, job done …
I tried it, realising the maths behind it, that 5.45m was the hyperfocal distance for a 35mm lens at f11, where most things are acceptability sharp from 2.7m onwards. So in the real-world, this turns out to to be great for landscape photography – set your lens to f11 and the focal distance to 3m, and boom 🎯
That said, if landscape is not your thing, walking around at f11 all the time can result in very flat images, especially if there isn’t a pop of colour or an eye-catching facial expression.
Don’t forget, the old landscape photographers rule-of-thumb about setting your focus to one third into your frame, when using apertures between f4 and f8 … it really does work.
I hope this helps you on your journey with film ! Paul.
💻 Instagram: @irishanalogadventures
